Saturday, 21 December 2013

Pow!

 
Hey there, nail lovers! After all those Christmas nails, I was quite excited to showcase my latest design. It's another one inspired by Wah Nails, and I've got to admit I was quite pleased with my first attempt. It's a little bit superhero, a little bit Roy Lichtenstein. Whichever way you want to look at it, I'll tell you how to do it so you too can unleash some comic book love onto your nails. But be warned - it takes a while...
 
First, paint each of your nails a different colour - as we're dealing with a pop art inspired creation, the brighter the better. For the record, I used Avon Nailwear in 'Viva Pink', 'Real Red', 'Sunshine', 'Rapid Black' and Barry M in 'Spring Green'. Then, using a very fine Nail Brush, paint a white zigzag line about half way down the nail plate. Then, fill this in with white to create an 'explosion' (it's a little fiddly but you can clean up any excess varnish later). Oh, and filling in the white takes a while, so make sure you've got something to do while you wait! Once that's all dried, use a black Nail Art pen to write any comic book related words like POW!, BAM! and CRASH! in the explosion. Next, outline your explosions with the black Nail Art pen again. Finally, use a white Nail Art pen to draw white polka dots across the coloured part of the nail. Then, you can relax - because it's finished!
 
Georgie
 

Wednesday, 18 December 2013

On the twelfth day of Christmas...Mistletoe

 
Well hello again! Yep, this final festive design completes my Twelve Days of Christmas Nails, and it only took almost an extra week to finish...woops. Moving on from that, I'll tell you how to get this Mistletoe design on your nails. Begin by painting your nails a festive colour (though not a dark one - my design features No 7 Nail Colour in 'Salsa'), and wait to dry. Then, using a very fine Nail Brush, paint three long strokes of green for the mistletoe leaves, and once these have dried, two smaller ones at the top of the bunch. After all of this has dried as well, finish by using a Nail Art pen to draw about three white dots in between the two shorter leaves for the berries. And that's all there is to it! Hope you've enjoyed browsing through all my Christmassy nails, and perhaps had a go at trying them out yourself. I'll be back soon with more weird and wonderful designs, so as always, watch this space! Thanks for looking, oh and Merry Christmas!
 
Georgie

On the eleventh day of Christmas...Christmas Trees

 
Hello, readers! Right, penultimate festive design...and it sure was fun to create. It's not quite as self-explanatory as the previous design, so here's how to do it; firstly, paint your nails White (this is just to make the trees stand out a little bit more). Next, using a very fine Nail Brush, paint a green outline of a tree - it should look a little bit like an arrow. Once these are done, use the brush again to fill in the trees with a series of thin brush strokes. Now, in order to do the next step, the trees must be completely dry. This takes a little while, so I suggest you go find something to do while you wait (I chose to carry on reading some more of Kazuo Ishiguro's Never Let Me Go, if you need some inspiration). So, once they're dry, use a Nail Art pen to draw a couple of red dots on the trees for baubles. Then, use a very fine Nail Brush to paint a tiny brown square for the tree stumps. Lastly, using a very fine Nail Brush again, paint a gold star on the tops of the trees. Finished! Check back soon for my final festive post...
 
Georgie

Monday, 16 December 2013

On the tenth day of Christmas...Simply Festive

 
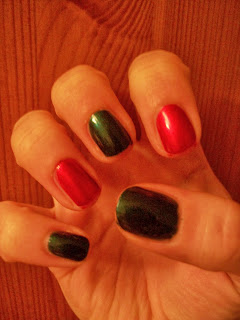
Good evening all, long time no see! What can I say other than sorry? My life is a busy one, and apparently it has become even busier during this festive blogging period, so I have unfortunately brought this next post to you almost a week late. Well, it's better than bringing it to you in April or whatever...anyway, moving swiftly on. This really is the quickest, easiest festive design so far - but I thought it was about time I settled for something so simple as just painting, with no tricky time consuming art involved. They're quite simply, just festive coloured nails. I used Avon Nailwear in 'Noir Emerald', and my new bottle of No 7 Nail Colour in 'Salsa'. The fastest way to inject some Christmas spirit onto your nails. Enjoy!
 
Georgie

Monday, 9 December 2013

On the ninth day of Christmas...Santa Hats


Hello, folks! Told you I'd get back on track with a festive post each day! I can relax now ;) So, alongside decorating your Christmas trees and switching on your fairy lights, some of you may be digging out your Santa hats. I haven't got a clue where mine is, so until that turns up, I've settled for Santa hats on my nails instead. Just paint a red triangle shape starting from the base of your nail (don't worry about it being too perfectly pointed - the white part will cover it up!) Then once dry, paint a slightly wobbly white strip across the bottom of the red. Finally, paint a white circle at the top of the hat. Lovely! Keep checking back for more festive designs!
 
Georgie

On the eighth day of Christmas...Falling Snow


Hey there, readers. Yet again, this post has been brought to you a day late and so again I'm sorry. Although, today's post will actually be arriving shortly after this one so I'll be back on track! Anyway, it's another snow related design - but much simpler than the Snowflakes if you've not got much patience. First, paint your nails a nice dark blue (my design uses Avon Nailwear in 'On Point Blue'). Afterwards, paint a couple of thick strips of white across the base of the nail for the snow. Finally, use a Nail Art pen to draw white dots for the falling snow. Fabulous! It's not the most extravagant design ever, but I'm trying to appeal to you folks who might be a bit scared to try anything a lot more complex. Either way, hope you like it!
 
Georgie

Sunday, 8 December 2013

On the seventh day of Christmas...Presents


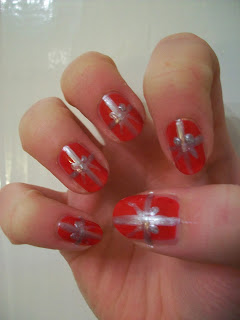
Hello again! Isn't it ironic how as soon as I talk about the fact that I've been blogging every day...I miss a day! I'm horrified at bringing you the seventh festive design on the eighth day in December, and I'm sure no one is that bothered, but I'll say sorry anyway. But when you're busy quite a lot of the time you get pretty tired, and so it got to the point that when I actually had a moment, 1am or so didn't seem like the best time to post. So anyway, enough rambling, on with the design! Paint your base colour (you don't have to use red - any festive colour you like will be just as fab), and wait to dry. Next, using a very fine Nail Brush, paint a vertical silver line down each nail, and then the horizontal one after (but only once the vertical line is dry - things can get a little ruined otherwise!) Finally, use a silver Nail Art pen to draw two dots for the bow and then two tiny flicks for the ribbon. Voila!
 
Georgie

Friday, 6 December 2013

On the sixth day of Christmas...Fairy lights


Evening, all! Quite shocked at myself in managing to bring you all a new post every day - hope I can keep it up! Anyway, some of you may be starting to put up your Christmas decorations (not me, yet), so why not add to that by rocking some pretty little fairy lights on your nails. Just paint your nails white, then using a very fine Nail Brush, paint a slightly wiggly black line across your nail. Finally, using whatever colours you like (I've gone for festive green, red and gold), paint some small triangle shapes on either side of the line. Repeat on all your nails, and it's complete! Hope these designs are getting you feeling festive - keep an eye out for more!
 
Georgie

Thursday, 5 December 2013

On the fifth day of Christmas...Snowmen


Hello all. December 5th may not have brought any real snow just yet, but today's festive design certainly has! Another relatively simple one to try; paint your nails white however many times you need. Then, using a black Nail Art pen, draw dots for the snowman eyes and smile. Finally, using a very fine Nail Brush, paint on a little orange carrot for the nose. Done! So even if we don't get any actual snow outside, you can make up for it with this design instead!
 
Georgie

Wednesday, 4 December 2013

On the fourth day of Christmas...Stars


Hi again. It's festive design number four, and trust me, this really is the simplest Christmas design yet! All you do is paint your nails any colour you like (a lighter colour is best so that the stars show up - I used Avon Nailwear in 'Mod Gold'). Then, you get perfect stars the easy way - just pop on a load of nail stickers! You can do it the more difficult and time consuming way and paint the stars on yourself, but the stickers are just a neat little trick to save yourself some time. Mine are from Avon (surprise, surprise!), but you can find them pretty much anywhere. So if you're desperate to try one of my designs but the thought of painting all that nail art terrifies you, then I'd recommend this design!
 
Georgie

Tuesday, 3 December 2013

On the third day of Christmas...Candy Canes


Welcome to the third day of festive designs! So, here's how to do Candy Canes; paint your nails red (I kind of betrayed Avon with this design by using my brand new O.P.I polish, but you've gotta shake things up once in a while, right?) Next, use a very fine Nail Brush to paint white stripes diagonally across the nail. Then on your thumbnail, use a very fine Nail Brush to draw a black candy cane shape. Finally, fill in with white stripes again to finish. Easy! Be sure to keep a watch for more festive designs to follow!
 
Georgie
 
P.S. To make things even more Christmassy, grab your iPod and get listening to some festive tunes whilst you're doing your nails - I'm gonna suggest Michael Buble's Christmas as a perfect example...

Monday, 2 December 2013

On the second day of Christmas...Snowflakes


Evening, all. My second festive design is Snowflakes - it takes patience and precision, but if you can get those two things right then it's really quite simple! First, paint your nails a dark colour (I used Avon Nailwear in 'Twilight Blue') and wait to dry. Next, using a very fine Nail Brush, paint a vertical silver line down the nail, making sure that there's not too much polish on the brush. Once this is dry, paint a criss-cross over the line. Finally (and you really need the patience and precision for this part!), paint one tiny line on either side of each spike to create the snowflake shape. Fabulous! Keep watching this space for more fun festive designs to come!
 
Georgie

Sunday, 1 December 2013

On the first day of Christmas...Christmas Pudding


Hey, readers! It still feels far too early to be thinking about Christmas, but I'm attempting to get into the festive spirit anyway by bringing you Twelve Days of Christmas Nails! I know that technically the twelve days of Christmas doesn't actually start until Christmas Day, but I just couldn't wait to get painting! So, over the next twelve days I'll be posting a new design each day, and I decided to start with the ultimate Christmas dessert besides cake - Christmas pudding! First, paint your nails brown (my design features Avon Nailwear in 'Vintage Boutique'), and wait to dry. Next, using a very fine white Nail Brush, paint around four or five drips above your cuticle, making sure that they vary in width a little. After this has all dried, use a Nail Art pen to draw two red dots for berries. Finally for the ivy, using a very fine Nail Brush again, draw a green line coming off each berry, then paint two tiny lines on either side of these. And that's how to create my Christmas Pudding nails - be sure to keep a lookout for the next post!
 
Georgie