Saturday, 21 December 2013

Pow!

 
Hey there, nail lovers! After all those Christmas nails, I was quite excited to showcase my latest design. It's another one inspired by Wah Nails, and I've got to admit I was quite pleased with my first attempt. It's a little bit superhero, a little bit Roy Lichtenstein. Whichever way you want to look at it, I'll tell you how to do it so you too can unleash some comic book love onto your nails. But be warned - it takes a while...
 
First, paint each of your nails a different colour - as we're dealing with a pop art inspired creation, the brighter the better. For the record, I used Avon Nailwear in 'Viva Pink', 'Real Red', 'Sunshine', 'Rapid Black' and Barry M in 'Spring Green'. Then, using a very fine Nail Brush, paint a white zigzag line about half way down the nail plate. Then, fill this in with white to create an 'explosion' (it's a little fiddly but you can clean up any excess varnish later). Oh, and filling in the white takes a while, so make sure you've got something to do while you wait! Once that's all dried, use a black Nail Art pen to write any comic book related words like POW!, BAM! and CRASH! in the explosion. Next, outline your explosions with the black Nail Art pen again. Finally, use a white Nail Art pen to draw white polka dots across the coloured part of the nail. Then, you can relax - because it's finished!
 
Georgie
 

Wednesday, 18 December 2013

On the twelfth day of Christmas...Mistletoe

 
Well hello again! Yep, this final festive design completes my Twelve Days of Christmas Nails, and it only took almost an extra week to finish...woops. Moving on from that, I'll tell you how to get this Mistletoe design on your nails. Begin by painting your nails a festive colour (though not a dark one - my design features No 7 Nail Colour in 'Salsa'), and wait to dry. Then, using a very fine Nail Brush, paint three long strokes of green for the mistletoe leaves, and once these have dried, two smaller ones at the top of the bunch. After all of this has dried as well, finish by using a Nail Art pen to draw about three white dots in between the two shorter leaves for the berries. And that's all there is to it! Hope you've enjoyed browsing through all my Christmassy nails, and perhaps had a go at trying them out yourself. I'll be back soon with more weird and wonderful designs, so as always, watch this space! Thanks for looking, oh and Merry Christmas!
 
Georgie

On the eleventh day of Christmas...Christmas Trees

 
Hello, readers! Right, penultimate festive design...and it sure was fun to create. It's not quite as self-explanatory as the previous design, so here's how to do it; firstly, paint your nails White (this is just to make the trees stand out a little bit more). Next, using a very fine Nail Brush, paint a green outline of a tree - it should look a little bit like an arrow. Once these are done, use the brush again to fill in the trees with a series of thin brush strokes. Now, in order to do the next step, the trees must be completely dry. This takes a little while, so I suggest you go find something to do while you wait (I chose to carry on reading some more of Kazuo Ishiguro's Never Let Me Go, if you need some inspiration). So, once they're dry, use a Nail Art pen to draw a couple of red dots on the trees for baubles. Then, use a very fine Nail Brush to paint a tiny brown square for the tree stumps. Lastly, using a very fine Nail Brush again, paint a gold star on the tops of the trees. Finished! Check back soon for my final festive post...
 
Georgie

Monday, 16 December 2013

On the tenth day of Christmas...Simply Festive

 
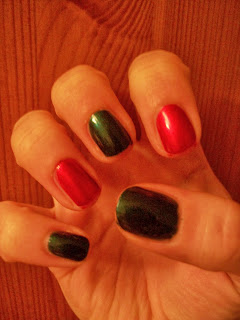
Good evening all, long time no see! What can I say other than sorry? My life is a busy one, and apparently it has become even busier during this festive blogging period, so I have unfortunately brought this next post to you almost a week late. Well, it's better than bringing it to you in April or whatever...anyway, moving swiftly on. This really is the quickest, easiest festive design so far - but I thought it was about time I settled for something so simple as just painting, with no tricky time consuming art involved. They're quite simply, just festive coloured nails. I used Avon Nailwear in 'Noir Emerald', and my new bottle of No 7 Nail Colour in 'Salsa'. The fastest way to inject some Christmas spirit onto your nails. Enjoy!
 
Georgie

Monday, 9 December 2013

On the ninth day of Christmas...Santa Hats


Hello, folks! Told you I'd get back on track with a festive post each day! I can relax now ;) So, alongside decorating your Christmas trees and switching on your fairy lights, some of you may be digging out your Santa hats. I haven't got a clue where mine is, so until that turns up, I've settled for Santa hats on my nails instead. Just paint a red triangle shape starting from the base of your nail (don't worry about it being too perfectly pointed - the white part will cover it up!) Then once dry, paint a slightly wobbly white strip across the bottom of the red. Finally, paint a white circle at the top of the hat. Lovely! Keep checking back for more festive designs!
 
Georgie

On the eighth day of Christmas...Falling Snow


Hey there, readers. Yet again, this post has been brought to you a day late and so again I'm sorry. Although, today's post will actually be arriving shortly after this one so I'll be back on track! Anyway, it's another snow related design - but much simpler than the Snowflakes if you've not got much patience. First, paint your nails a nice dark blue (my design uses Avon Nailwear in 'On Point Blue'). Afterwards, paint a couple of thick strips of white across the base of the nail for the snow. Finally, use a Nail Art pen to draw white dots for the falling snow. Fabulous! It's not the most extravagant design ever, but I'm trying to appeal to you folks who might be a bit scared to try anything a lot more complex. Either way, hope you like it!
 
Georgie

Sunday, 8 December 2013

On the seventh day of Christmas...Presents


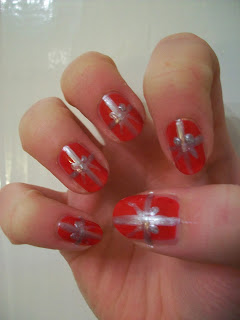
Hello again! Isn't it ironic how as soon as I talk about the fact that I've been blogging every day...I miss a day! I'm horrified at bringing you the seventh festive design on the eighth day in December, and I'm sure no one is that bothered, but I'll say sorry anyway. But when you're busy quite a lot of the time you get pretty tired, and so it got to the point that when I actually had a moment, 1am or so didn't seem like the best time to post. So anyway, enough rambling, on with the design! Paint your base colour (you don't have to use red - any festive colour you like will be just as fab), and wait to dry. Next, using a very fine Nail Brush, paint a vertical silver line down each nail, and then the horizontal one after (but only once the vertical line is dry - things can get a little ruined otherwise!) Finally, use a silver Nail Art pen to draw two dots for the bow and then two tiny flicks for the ribbon. Voila!
 
Georgie

Friday, 6 December 2013

On the sixth day of Christmas...Fairy lights


Evening, all! Quite shocked at myself in managing to bring you all a new post every day - hope I can keep it up! Anyway, some of you may be starting to put up your Christmas decorations (not me, yet), so why not add to that by rocking some pretty little fairy lights on your nails. Just paint your nails white, then using a very fine Nail Brush, paint a slightly wiggly black line across your nail. Finally, using whatever colours you like (I've gone for festive green, red and gold), paint some small triangle shapes on either side of the line. Repeat on all your nails, and it's complete! Hope these designs are getting you feeling festive - keep an eye out for more!
 
Georgie

Thursday, 5 December 2013

On the fifth day of Christmas...Snowmen


Hello all. December 5th may not have brought any real snow just yet, but today's festive design certainly has! Another relatively simple one to try; paint your nails white however many times you need. Then, using a black Nail Art pen, draw dots for the snowman eyes and smile. Finally, using a very fine Nail Brush, paint on a little orange carrot for the nose. Done! So even if we don't get any actual snow outside, you can make up for it with this design instead!
 
Georgie

Wednesday, 4 December 2013

On the fourth day of Christmas...Stars


Hi again. It's festive design number four, and trust me, this really is the simplest Christmas design yet! All you do is paint your nails any colour you like (a lighter colour is best so that the stars show up - I used Avon Nailwear in 'Mod Gold'). Then, you get perfect stars the easy way - just pop on a load of nail stickers! You can do it the more difficult and time consuming way and paint the stars on yourself, but the stickers are just a neat little trick to save yourself some time. Mine are from Avon (surprise, surprise!), but you can find them pretty much anywhere. So if you're desperate to try one of my designs but the thought of painting all that nail art terrifies you, then I'd recommend this design!
 
Georgie

Tuesday, 3 December 2013

On the third day of Christmas...Candy Canes


Welcome to the third day of festive designs! So, here's how to do Candy Canes; paint your nails red (I kind of betrayed Avon with this design by using my brand new O.P.I polish, but you've gotta shake things up once in a while, right?) Next, use a very fine Nail Brush to paint white stripes diagonally across the nail. Then on your thumbnail, use a very fine Nail Brush to draw a black candy cane shape. Finally, fill in with white stripes again to finish. Easy! Be sure to keep a watch for more festive designs to follow!
 
Georgie
 
P.S. To make things even more Christmassy, grab your iPod and get listening to some festive tunes whilst you're doing your nails - I'm gonna suggest Michael Buble's Christmas as a perfect example...

Monday, 2 December 2013

On the second day of Christmas...Snowflakes


Evening, all. My second festive design is Snowflakes - it takes patience and precision, but if you can get those two things right then it's really quite simple! First, paint your nails a dark colour (I used Avon Nailwear in 'Twilight Blue') and wait to dry. Next, using a very fine Nail Brush, paint a vertical silver line down the nail, making sure that there's not too much polish on the brush. Once this is dry, paint a criss-cross over the line. Finally (and you really need the patience and precision for this part!), paint one tiny line on either side of each spike to create the snowflake shape. Fabulous! Keep watching this space for more fun festive designs to come!
 
Georgie

Sunday, 1 December 2013

On the first day of Christmas...Christmas Pudding


Hey, readers! It still feels far too early to be thinking about Christmas, but I'm attempting to get into the festive spirit anyway by bringing you Twelve Days of Christmas Nails! I know that technically the twelve days of Christmas doesn't actually start until Christmas Day, but I just couldn't wait to get painting! So, over the next twelve days I'll be posting a new design each day, and I decided to start with the ultimate Christmas dessert besides cake - Christmas pudding! First, paint your nails brown (my design features Avon Nailwear in 'Vintage Boutique'), and wait to dry. Next, using a very fine white Nail Brush, paint around four or five drips above your cuticle, making sure that they vary in width a little. After this has all dried, use a Nail Art pen to draw two red dots for berries. Finally for the ivy, using a very fine Nail Brush again, draw a green line coming off each berry, then paint two tiny lines on either side of these. And that's how to create my Christmas Pudding nails - be sure to keep a lookout for the next post!
 
Georgie

Saturday, 30 November 2013

Stained Glass


Hey nail lovers, here's my first attempt at a design from my shiny new Wah Nails book. They're supposed to be like stained glass windows but they kind of remind me of Smarties too...oh well, you choose what you prefer! Anyway, first paint a couple of yellow dabs on the nail (be sure to flatten the brush a little to make the shape a bit more square). Next, paint some blue dabs in the same way but be careful not to let the colours touch each other. Then do the same for green, and finally add some pink, still making sure that the colours aren't touching (it takes precision and patience for this, so give yourself loads of time!) Once all the colours have dried, use a black Nail Art pen to fill in all the gaps and make the colours really stand out. And that's it! Keep watching for future examples of Wah Nail designs - I can't wait to choose the next one!

Georgie

Tuesday, 26 November 2013

The Ultimate Gift for Nail Lovers


Hey everyone! In this post I thought I'd show off my latest nail-related resource. It was my birthday last week (I should've done birthday nails or something...maybe next year!), and I received the ultimate guide to amazingly cool nails - The Wah Nails Book of Nail Art! So a big thank you to Sophie (http://sophiesconscience.blogspot.co.uk/) for getting that for me. I've been having a look through and there's so many great designs that I can't wait to try out - or to take inspiration from and customize to my tastes - so I'd really recommend it for any budding nail artists out there. All that's left for you to do? Get reading and then get painting!
 
Georgie

Thursday, 21 November 2013

Vans

 
Hello, folks! I'd been struggling with a new design to come up with for the next post, so I thought I'd get looking around for inspiration. I started with the shoes that were on my feet at the time, and so I went with those! Yep, this design was inspired by my beloved Vans - well, I've done Converse nails, why not try a different shoe? - and this is how to create the look yourself. First, paint all but one of your nails White - leave one nail to paint Black, but that's purely to change things up a bit, so it's optional. Next, using a very fine Nail brush, paint thin black vertical lines down each nail except your thumbnail (about three or four). Once dry, paint more black lines across the nail - your nails should now resemble some kind of empty noughts and crosses grid. Wait to dry, then use a black Nail Pen to fill in every other square so the nails now look like a chess board. Finally, using a very fine brush, paint the Vans logo onto your thumb - and it's done! I'm gonna have to think of another shoe-inspired design now - any ideas would be appreciated...
 
Georgie


Sunday, 17 November 2013

Newspaper Print


Evening all! I've been meaning to show you all this design for ages, but it could only be created with a bit of shopping and I kept forgetting to do that...oh well, I'm sorry. But anyway, here's how to do newspaper print nails; paint your White base colour the required number of times. Once completely dry (this is essential in order for the design to be a success), starting with your first finger, dip the nail into some surgical spirit - this is the key ingredient that I kept forgetting to buy! Next, take the nail out and place a piece of newspaper faced down over the nail, then press on to coat. Leave for about 10 seconds, then gently peel away the newspaper to reveal the print that should now have been transferred onto the nail. Sweet, no? Repeat the process for the rest of your nails, and then finally immerse your hands in lukewarm water to seal the design. It does take a while to create, but it's sure worth it.
 
Just a warning - don't be surprised if this design goes wrong the first time. Sometimes the newspaper doesn't stick properly so you end up pulling away all the polish instead - don't panic, simply wipe everything off that nail and try again. Soon enough you'll be a master of newspaper print nails - enjoy!
 
Georgie 


Friday, 1 November 2013

Holland Flags


Evening all! This latest design was inspired by my recent travels. When I said that my reason for delaying new posts was due to a bit of gallivanting, one of the places that I had ventured to was Amsterdam. Although if you're good with geography and can easily identify flags, then it should've been pretty obvious to you where I'd been if I hadn't have said. Right, now I'm just rambling. Sorry. Anyway, I just painted my nails white, then painted over a few strips of Avon Nailwear in Real Red, then a couple of strips of On Point Blue. Then just tidy up the edges, and your Dutch flags are complete! Or, if you want to be really adventurous, take inspiration from the pretty print on these clogs that I found, and have a go at tulips and windmills as well. But if you're not feeling that brave, then just simply stick with the flags - it's entirely up to you!
 
Georgie


Magnetic Nails


 Hey there nail fans! Apologies for posting a bit later than I would've liked - I've been gallivanting off to various places recently and ended up neglecting the blog slightly. So, there's some more new polish to show you all this week - but don't fret, next post will see the return of a new design. Promise ;) Anyway, feast your eyes on this snazzy new varnish - this is Fuchsia Force, part of Avon's new Colour Attract range of magnetic nail polish. When the polish is still wet, you use a Magnetic Polish Wand (see the second picture) to create the star pattern. It's not the best design to show up in a photo, so you're just gonna have to take my word for it! It's a little like the Opal Top coat I brought to you in the previous post, in that this is a great way to add some pizazz to plain painted nails. Have a try!
 
Georgie
 

PS: Don't let yourself get too distracted when using the magnetic wand, as it requires a steady hand. I made the mistake of watching Gogglebox while painting this look, and a whole lot of giggling whilst trying to do perfect nails is not an easy task. Just so you know.

Sunday, 6 October 2013

New Nail Varnish!


Hello folks! This is Avon Nailwear in Opalesce, the latest addition to my ever expanding nail varnish collection. It's a top coat with a twist - clear varnish with shimmery opal coloured flecks. Just paint your nails in your colour of choice (the example design above is Avon Nailwear in On Point Blue), then simply add a few layers of the top coat for an extra sparkly touch. Or if you'd prefer, simply pop it on over bare nails (as seen below) for a subtle shimmer. It dries super fast as well, so if you're short of time but still want to give your nails a shiny edge, be sure to give this one a try!


Georgie


Monday, 30 September 2013

Ladybirds


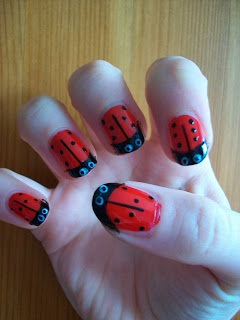
Hi all, it's ladybirds this week. I'd already painted my nails plain red, but I got bored, as I often do when I've painted my nails in just one colour. So, they turned into ladybirds, and here's how to create the design yourself; after a couple of coats of red polish (I used Avon Nailwear in Real Red), use a very fine brush to paint a black curve across the top of your nail (this is called the 'smile line'). Once dry, carefully fill in the area with black polish (I used Avon Nailwear in Rapid Black). It's quite possible that you'll go over the edges, but you can tidy that up later. Next, paint a fine black line down the centre of your nail, then use a Nail Art pen to draw black dots down either side. Finally, use a white Nail Art pen to draw slightly thicker white dots along the top of your nail, then once those are dry, draw smaller black ones over the top for the eyes. And that's it - make sure to try it out!

Georgie

Tuesday, 24 September 2013

Eyes


Evening, folks. Quite simply, this new design is just a load of eyes on your nails. It's been a bit strange having five eyes staring up at you from your hand - it's kind of made me feel like Count Olaf from A Series of Unfortunate Events with his eye tattoo on his ankle, if anyone reading this ever read those books - but hey, I still think it's a pretty cool design. So, here's how to do it; paint a couple of coats (ideally a darker colour so that the eyes stand out more - I used Avon Nailwear in Caliente Couture) and wait to dry. Next, using a very fine Nail brush, paint a white outline of an eye on each nail, then fill in the eye with a thicker brush (be careful not to go over the edges, though). Then, once the whites have dried, paint a green circle over each eye using a very fine brush - or you could use blue, red, whatever eye colour you like really - then leave to dry again. Next, use a black Nail Art pen to draw a pupil, then finally use a very fine brush to paint a black outline around each eye to make it really stand out. And that's finished! Have a go if you fancy it!

Georgie

Tuesday, 17 September 2013

Half Moon Manicure


Hey all, here's another simple but pretty design to try - a half moon manicure. Just paint your base colour (I used Avon Nailwear in Twilight Blue, but you can use pretty much any colour), and wait to dry. This particular colour is actually part of Avon's Speed Dry range, so each coat only takes about 30 seconds to dry. Then, using a silver Nail Art pen, carefully draw a little semi circle above your cuticle and then a line underneath to form a half moon. Once dry, fill in with more silver, and it's done! It's just a nice little extra to add to basic painted nails, so if you're not quite ready to try some of the more complex designs, this is a good one to start with. The half moon manicure is also supposed to give the illusion of longer nails, but I'll let you decide if you agree with that!

Georgie

New Nail Polish and Tip #2!


Afternoon everyone! Just wanted to show the latest nail polish to join my ever expanding collection, 'Fiery Sky'. It's the perfect shade to remind me of Autumn, plus it adds to the shimmery polish trend that's going on this season. See, so versatile already! I'll get thinking of a design that features this colour, so watch this space! And my top tip for this week concerns tidying up your Nail Art. If you go over the edge of your nail with the polish (I do this all the time), just dip a cotton bud into nail varnish remover to neatly wipe off any excess. Simple, but effective!

Georgie

Tuesday, 10 September 2013

Pianos


Evening folks! This design is for all you music lovers out there, plus it pays homage to the instrument that I've started learning (I'm pretty bad, though). Anyway, paint your White base colour (I probably don't even need to remind you about the minimum four coat rule now), and wait to dry. Next, use a very fine Nail Brush to paint the black keys - I think they're called sharps - and it's easier to paint a rectangle and then fill it in by painting several thin lines. Finally, paint another very fine line underneath to separate the white keys. And voila! So even if you're like me and you're not exactly an accomplished piano player (yet!), at least you'll have this design to make up for it.

Georgie

Monday, 2 September 2013

Super Mario Mushrooms


Hello everyone, back again quickly! Okay, here's another geeky yet kinda nostalgic design for you all, but be warned - it takes quite a long time. Don't let that stop you though - when it comes to Nail Art, it's all about patience, I think. So, here's how to do it; paint your base colours as normal (this design here features Avon Nailwear in Coral Beat, Real Red, On Point Blue, Sunshine and Barry M in Spring Green). Next, using a very fine brush, paint a white curve along the top of your nail (a little bit like the Converse design), then fill in the space with a few coats of White. Once dry, use a White Nail Art pen to draw different sized dots on the coloured nail plate. To finish, use a very fine brush to paint two small Black lines for eyes over the white. If you've got the time, be sure to give it a go!

Georgie

Pink Polka Dots


Hey all, welcome to my first post of the Autumn on this blog - can't believe that Summer's over for another year already. Anyway, to follow on from the rather time consuming Stormtroopers design, I thought I'd bring you a rather simple yet pretty look. I also seem to own quite a large amount of polka dot related items, so I wanted to expand on that with my nails. I used Avon Nailwear in Seduce Me Strawberry as my base colour, then just used a slightly shimmery white Nail Art pen to draw on all the polka dots. Nice and simple - why not try some other colours too?

Georgie

Tuesday, 27 August 2013

Stormtroopers


Hi all! Get your geek on with this Star Wars design and make George Lucas proud! (Personally I'm all for the Rebels, but a Chewbacca design is proving tricky!) As the base coat is White, the minimum four coat rule applies. After that, simply use a very fine black Nail brush to paint on everything else. It takes a while, but I think it's worth it. Enjoy!

Georgie

Wednesday, 21 August 2013

Harry Potter


Hey everyone! This post showcases my Potter inspired nails, and I promise you that they're not too difficult. First, paint your base colours (mine features Avon Nailwear in Rapid Black, Noir Emerald, On Point Blue, Real Red and Sunshine). After a few coats of each, use a very fine nail brush to paint three or four stripes over each nail (silver for Slytherin and Ravenclaw, gold for Gryffindor and black for Hufflepuff). Finally, use a fine brush again to paint the Deathly Hallows symbol in white. Once everything dries, seal the design with a clear topcoat. And there you have it - like magic!

Georgie

Saturday, 17 August 2013

Hello Kitty


Hi all. Fan of Hello Kitty? Now you can show it through your nails! It's the perfect choice for me, considering the amount of Hello Kitty stuff that I own - I think I must've been a Japanese teenage girl in a previous life. When working with the white polish, as before, the same rules apply - expect to use at least four coats. Enjoy!

Georgie

Wednesday, 14 August 2013

Tuxedos


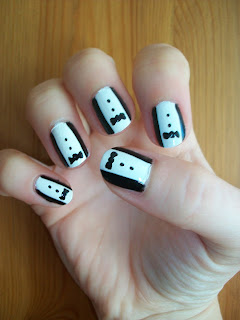
Hi all! This time, it's the turn of the Tuxedos. This design tends to be one of the most well loved by everyone - plus I saw Zooey Deschanel rocking a similar design at an awards ceremony earlier this year - so here's how to do it; paint your nails white (I used Avon Nailwear - that's kinda obvious by now), but I paint at least four or even five coats. Once dry, use a black Nail Art pen to draw the bowtie and buttons. Finally, using a very fine brush, paint a black strip down each side of the nail for the suit jacket. And there you have it! This design will add a little black tie glamour to any event, so get painting!

Georgie

Monday, 12 August 2013

New Nail Stuff and Top Tips


Hi there folks! No new design this week - don't worry though, I'll get posting one very soon! Just wanted to showcase my lovely new nail varnish case - I thought it was such a fabulous find that I had to stick it up on here. It's already been filled with just some of my nail collection (as seen here), so I'm not sure where the rest of it is gonna go! Anyway, in between new designs, I thought I might share some top nail tips. My tip this week concerns coats; the lighter the colour, the more coats you'll need. I always use at least three coats regardless of colour, but with lighter colours you might need one or two more. More tips and designs to follow!

Georgie

Wednesday, 7 August 2013

Minions (Despicable Me)


Hey all you Nail Art lovers! You may have mixed opinions on whether this design is cool or not, but I love it. I did wonder for a second if I was a little too old to be having Despicable Me nail art. On the other hand, it's such a fun design and possibly one of the coolest yet, so who cares if it's inspired by a kids film? In the words of Avril Lavigne, here's to never growing up...

Georgie

Wednesday, 31 July 2013

Watermelons


Hello everyone! Make like Baby in Dirty Dancing and carry a watermelon...on your nails! Firstly, paint your base colour as normal - I used Avon Nailwear in Coral Reef. Next, paint a fine green line along the top of your nail, then a white one underneath once the green has dried. Finally, use a black nail pen to draw the watermelon seeds, and there you have it! This is another cute design for Summer - why not combine this look with my Strawberries design? Have fun!

Georgie

Thursday, 25 July 2013

Converses


Hi Nail Nerds! This has to be possibly my favourite design yet. It's also one of the slightly trickier ones, but not to worry. The key is time - you can't rush this design! Paint your nails as normal (I used Avon Nailwear in Viva Pink, Coral Beat, Sunshine, Vintage Blue and Barry M in Spring Green) - at least 3 coats for each. Oh, but if you'd rather not do multi-coloured, only one colour looks just as good. Then, using a very fine brush, paint on 2 crosses on each nail for the laces, then a thicker white strip across the top. Once dry, use a white nail pen to dot the ends of the laces. Finally, use a black nail pen to draw smaller dots over the top, then paint a fine black line over the top of the thick white lines. And there you have it! This design gets compliments from guys and girls alike, so why not have a go?

Georgie

Tuesday, 23 July 2013

Union Jacks


Hey Nail fans! With the exciting royal baby news (congratulations Wills and Kate!) I think this patriotic little design is pretty appropriate. Okay, they're not amazing, but it was my first try at this design. Just paint your nails blue (I used Avon Nailwear in Vintage Blue), then use a white nail art pen to draw the lines. Finally, use a red one to draw slightly finer lines over the top. Make sure to try it out!

Georgie

Monday, 22 July 2013

Moustaches


Hello everyone! These are my first ever Moustache Nails, and I've gotta say I'm certainly loving them. Oh, a little tip with the base colour - be prepared to use a lot of coats with this design (I used Avon Nailwear in White). Be sure to give them a try!

Georgie

Saturday, 20 July 2013

Strawberries

Hey everyone! I thought I'd start with a design that's pretty appropriate for the apparent heat-wave that we're currently in. Strawberries automatically make me think of Summer, plus this design happens to be one of my favourites. All you do is paint your nails red (I used Avon Nailwear in Real Red), and then use yellow and green nail pens to draw the leaves and seeds. Have a go for yourself, and inject a little bit of Summer onto your nails!

Georgie

Thursday, 18 July 2013

Welcome Nail Nerds!

Hey there Nail Art Lovers!
I absolutely love painting my nails. In fact, I can't even remember the last time I was spotted with bare nails. But it's boring painting them just one colour, so a while ago I started getting a bit more creative. And I've had so many compliments about my various designs, I thought I'd better get blogging about them. So enjoy my future posts, have a go at the designs, and you may even end up becoming a little bit of a Nail Nerd yourself...

Georgie